
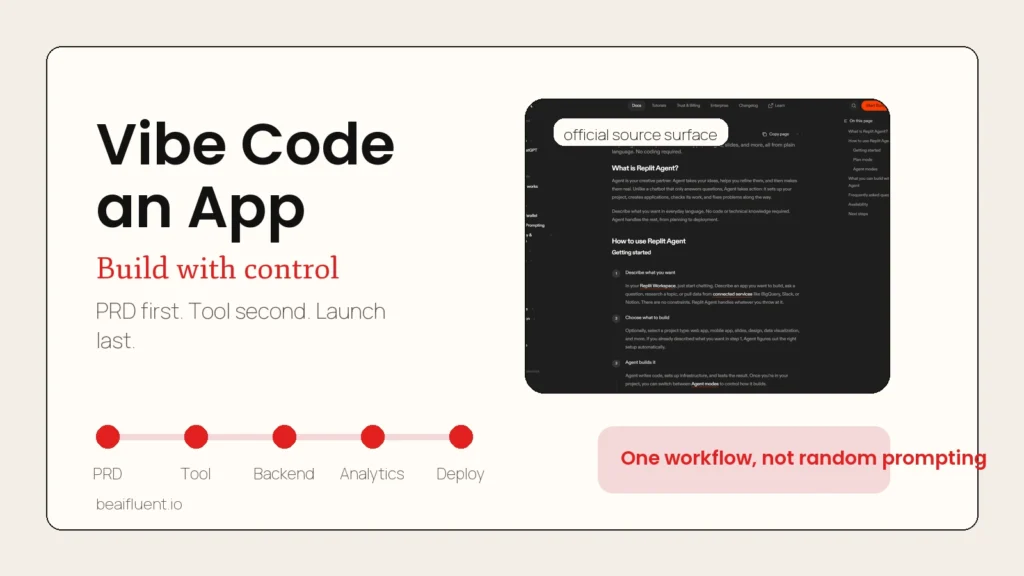
To vibe code an app, start with a short Product Requirements Document, choose an AI builder or coding agent that matches your skill level, connect a backend only when your app needs stored data, add revenue and usage analytics before launch, test the app like a user, then deploy it to web, iOS, or Android. The mistake is treating vibe coding as random prompting. The better workflow treats AI as a fast builder inside a real product process.
This guide is for beginners and practical builders who want the useful version of vibe coding, not the hype version. It expands the reel’s 60-second roadmap into a repeatable workflow you can actually follow: idea, PRD, tool, backend, analytics, testing, and deployment.
Answer Engine Summary: Vibe coding works best when the human owns product judgment and the AI handles implementation speed. Write the app brief first, keep the first version small, verify every generated change, and launch only after the data, auth, payment, and deployment path match the type of app you are building.
 Caption: The best vibe coding workflow starts with a brief, then moves through build, backend, analytics, testing, and deployment.
Key Takeaways
- Vibe coding is AI-assisted app building through natural language, but it still needs product planning, testing, and launch discipline.
- A one-page PRD should define the user, problem, core features, data model, screens, constraints, and success metric before you open an AI coding tool.
- Use no-code or prompt-to-app builders for simple MVPs, and coding agents like Cursor, Claude Code, Codex, or Replit when you need more control over code.
- Add Supabase or Firebase when your app needs accounts, saved data, files, real-time updates, or server-side logic.
- Add analytics and revenue tracking before launch, not after you already have confusing usage or subscription data.
- Web apps can often launch through Vercel; iOS and Android apps need platform accounts, review requirements, and extra testing steps.
- The safest first build is narrow: one audience, one problem, one core workflow, one success metric.
Table of Contents
- What does it mean to vibe code an app?
- The vibe coding workflow at a glance
- Step 1: Turn the idea into a PRD
- Step 2: Choose the right AI coding tool
- Step 3: Add a backend only when the app needs one
- Step 4: Add analytics before you monetize
- Step 5: Test the app before you ship
- Step 6: Deploy to web, iOS, or Android
- A beginner-safe vibe coding checklist
- FAQ
What Does It Mean to Vibe Code an App?
Vibe coding is the process of building software by describing the desired outcome in natural language and letting AI tools generate, edit, or wire the code. In a good workflow, the builder still decides the product goal, reviews the output, tests the app, and controls what gets shipped.
That last part matters. Vibe coding is not a replacement for thinking. It is a way to compress the distance between idea and working prototype.
The phrase is often used casually, but the practical version has a clear shape. You describe the product, ask an AI builder to create or modify the app, inspect what it made, test it, and repeat until the first version is usable.
If you are new to the broader tool landscape, start with the site’s guide to top AI tools for everyday work before comparing every app builder. If you already know you want terminal-native coding support, the guide to AI CLIs like Codex, Claude Code, and Gemini CLI gives more depth on coding agents.
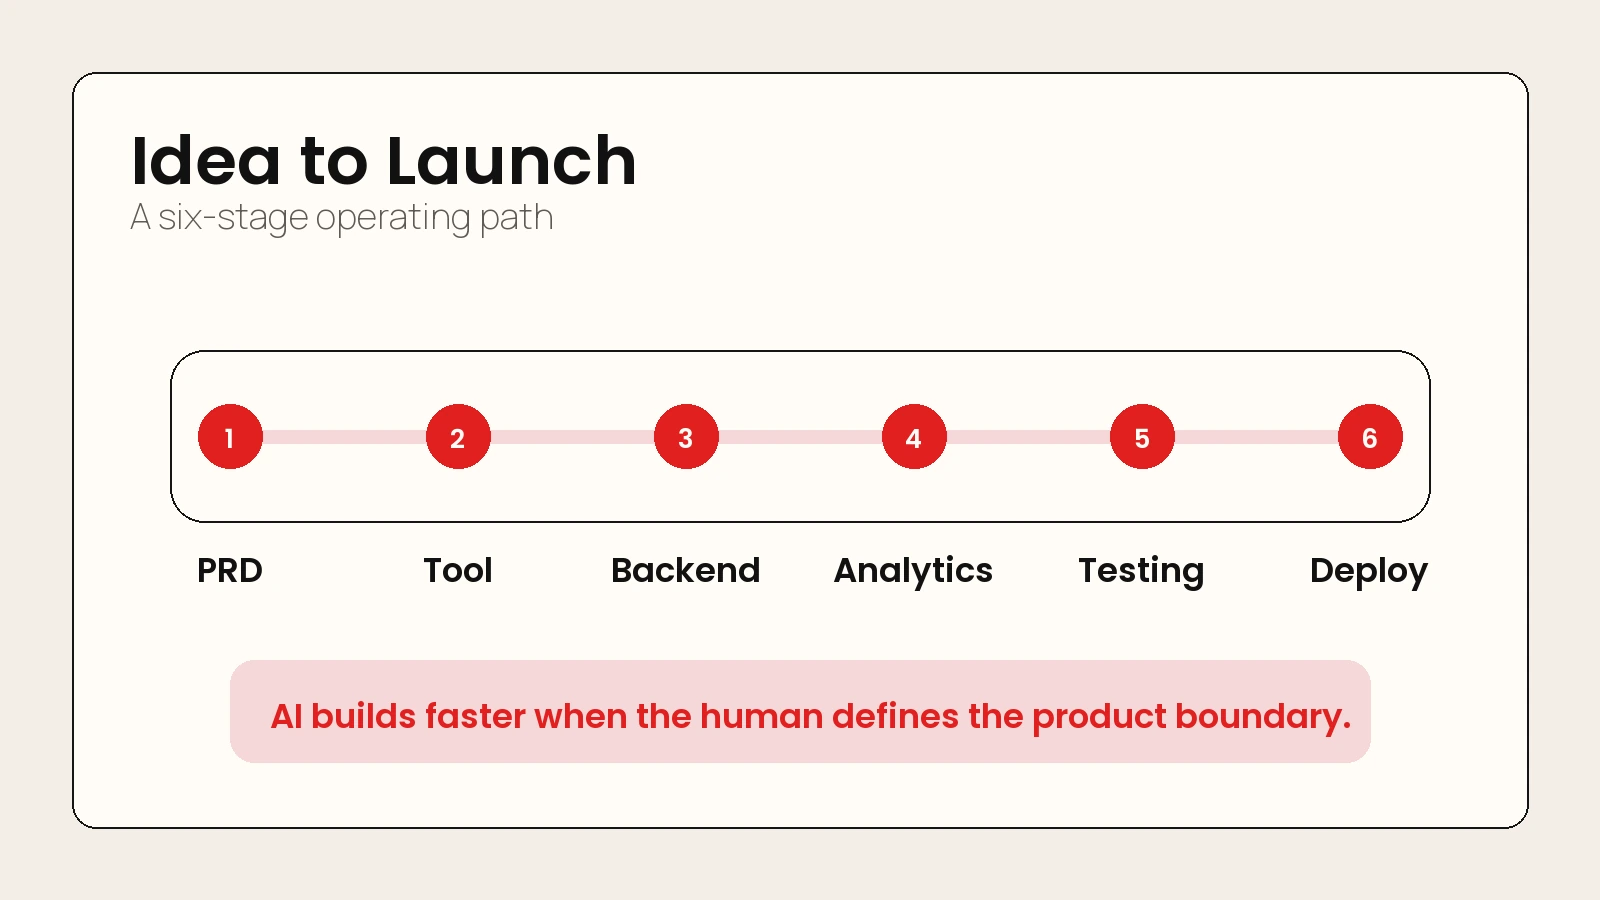
The Vibe Coding Workflow at a Glance
The reel’s core lesson is right: the workflow should be structured before it becomes fast. A useful vibe coding app workflow has six stages.
| Stage | Output | Main question to answer |
|---|---|---|
| 1. PRD | One-page product brief | What exactly are we building first? |
| 2. Tool choice | Builder or coding agent | Who should generate and edit the app? |
| 3. Backend | Data, auth, storage, functions | What needs to persist or run securely? |
| 4. Analytics | Events, revenue, onboarding data | How will we know if users find value? |
| 5. Testing | Bug list and launch checks | What breaks when a real user tries it? |
| 6. Deployment | Web or app store release | Where will users access it? |
This article focuses on apps that a beginner or small team can realistically build. That means simple web apps, mobile MVPs, internal tools, directories, calculators, trackers, client portals, content tools, and lightweight subscription products.
 Caption: The workflow keeps AI speed inside a product process: brief, build, backend, analytics, testing, and deployment.
Step 1: Turn the Idea Into a PRD
A Product Requirements Document, or PRD, is a short product brief that tells the AI what to build and tells you what to reject. It does not need to be corporate or long. For vibe coding, a one-page PRD is usually enough.
The goal is to turn a messy idea into testable instructions. Instead of saying “build me a habit app,” you want to define the user, the core action, the screens, the data, and what version one should include.
A simple PRD template for vibe coding
Use this structure before you open the builder:
- App name: Working title only.
- Target user: The specific person this helps.
- Problem: The annoying or expensive problem the app solves.
- Core workflow: The one action the user should complete.
- Main screens: Home, onboarding, dashboard, settings, checkout, or any other required views.
- Data model: What needs to be saved, such as users, projects, notes, uploads, payments, or tasks.
- Account rules: Whether users need login, roles, permissions, or private data.
- Monetization: Free, paid download, subscription, one-time purchase, ads, or internal-only.
- Success metric: One metric that proves the first version works.
- Out of scope: Features you will not build in version one.
Here is a stronger starter prompt:
Turn this rough app idea into a one-page Product Requirements Document.

Audience: busy freelance designers.
Problem: they forget to follow up with leads after a discovery call.
App idea: a lightweight follow-up tracker with reminders and simple email templates.

Include: target user, user problem, version-one features, screens, data model,
auth needs, monetization idea, launch risks, and out-of-scope features.
Keep the first version buildable in one week.
The important move is the last sentence: keep the first version buildable. Vibe coding can create a lot of code quickly, so your job is to keep the product small enough to review.
What should not go in the first PRD
Do not start with every dream feature. Leave these out until the basic workflow works:
- team accounts
- admin dashboards
- complex permissions
- social sharing
- multi-language support
- native mobile features
- advanced billing rules
- AI features inside the app itself
Those features can be useful later. In version one, they usually create more testing and security surface than a beginner can review well.
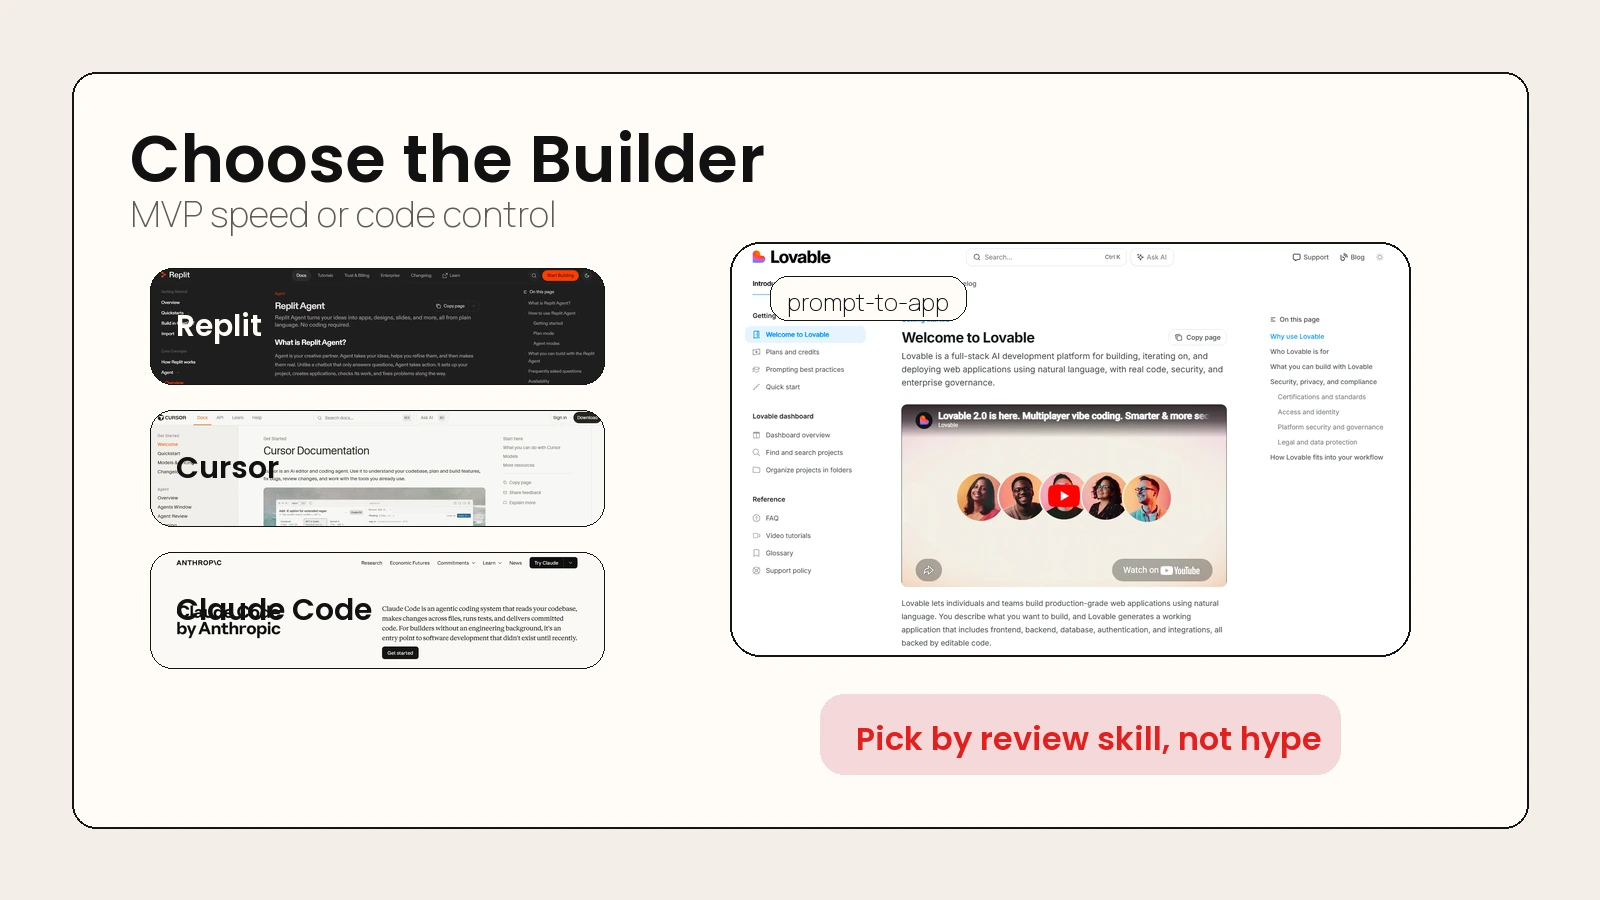
Step 2: Choose the Right AI Coding Tool
Your tool choice depends on how much code control you need. The reel names tools such as Base44, Replit, Cursor, and Claude Code. That is the right category, but the better decision is not “which tool is popular?” It is “which tool matches my skill level and launch path?”
Some tools are prompt-to-app builders. Others are coding agents or AI-first editors. Replit says Replit Agent can turn ideas into apps from plain language and handle planning through deployment in its workspace docs. Lovable describes itself as a full-stack AI development platform that builds web applications from natural language with real code, backend, database, authentication, and integrations. Anthropic says Claude Code works at the project level: reading the full codebase, planning across files, making changes, running tests, and iterating on failures.
| Tool type | Examples | Best for | Watch out for |
|---|---|---|---|
| Prompt-to-app builder | Lovable, Base44, Bolt, Replit Agent | First MVPs, landing-to-app flows, prototypes, non-technical builders | You still need to understand data, auth, privacy, and deployment limits |
| AI code editor | Cursor | Builders who want code access in an editor | You must review generated code and project structure |
| Coding agent | Claude Code, Codex, Gemini CLI | Developers or technical builders working in a repo | Requires version control, terminal comfort, and stronger review habits |
| No-code platform | Bubble, Glide, Softr-style tools | CRUD apps, directories, internal tools | Portability and custom logic can become constraints |
For a complete beginner, start with a prompt-to-app builder if the app is simple. For a technical builder, start with a coding agent inside a Git repo. For a founder who wants a real product, choose based on where the app should live after launch, not which demo looks fastest.
 Caption: Prompt-to-app builders fit fast MVPs; coding agents fit controlled repo work.
When to use an AI app builder
Use an AI app builder when the first version is mostly screens, forms, simple data, and basic workflows. Good examples include:
- a lead tracker
- a niche directory
- a booking request form
- a simple dashboard
- a course companion app
- a lightweight habit or finance tracker
These tools are useful because they can combine UI, routing, database setup, and deployment faster than a beginner could wire them manually.
When to use a coding agent
Use a coding agent when you need:
- access to a real codebase
- custom integrations
- version control
- tests
- code review
- a production deployment path
- more control over architecture
This is where tools like Cursor, Claude Code, Codex, and Gemini CLI make more sense. If you plan to maintain the app, hire a developer later, or connect several services, code ownership matters.
Step 3: Add a Backend Only When the App Needs One
A backend is the part of the app that handles stored data, user accounts, server-side rules, file storage, scheduled jobs, and secure operations. You do not need a complex backend for every prototype, but you do need one when the app must remember things between sessions or protect user data.
Supabase and Firebase are common choices because they package several backend needs into one platform. Supabase documents a full Postgres database, authentication, storage, real-time features, and edge functions. Firebase’s product docs include services for authentication, Cloud Firestore, hosting, app distribution, crash reporting, analytics, remote config, performance monitoring, and testing.
| App need | Backend feature | Common tool fit |
|---|---|---|
| User accounts | Authentication | Supabase Auth or Firebase Authentication |
| Saved records | Database | Supabase Postgres or Cloud Firestore |
| Uploaded files | Storage | Supabase Storage or Firebase/Google Cloud storage paths |
| Live updates | Realtime sync | Supabase Realtime or Firebase realtime patterns |
| Server logic | Functions | Supabase Edge Functions or Cloud Functions/Firebase App Hosting patterns |
| Access rules | Security policies | Supabase Row Level Security or Firebase Security Rules |
The beginner mistake is connecting a backend too early and then letting the AI create messy data structures. Before you connect anything, ask the AI to propose the data model in plain English.
Backend prompt to use before implementation
Before writing code, propose the simplest data model for this app.

App: follow-up tracker for freelance designers.
Users can create leads, log last contact date, choose next follow-up date,
and mark a lead as won, lost, or active.

Return:
- tables or collections
- fields
- relationships
- auth rules
- edge cases
- what should not be stored yet
Once the model is clear, ask the tool to implement one workflow at a time. Do not ask it to “add the whole backend” in one step.
Step 4: Add Analytics Before You Monetize
Analytics should answer one question: are users reaching the value moment? Revenue analytics should answer a second question: are users willing to pay after reaching that moment?
For subscription apps, tools like Adapty can be useful because they focus on paywalls, onboarding, purchases, trials, renewals, and revenue events. Adapty’s docs define revenue for A/B tests as purchases and renewals generated by the test, before App Store or Play Store commission, and define purchase conversion rate as purchases divided by views.
You do not need to track everything. Track the minimum events that explain the user’s path.
| Funnel stage | Event to track | Why it matters |
|---|---|---|
| First open | app_opened |
Confirms traffic is real |
| Account creation | signup_completed |
Shows onboarding progress |
| Core action | lead_added, note_saved, or your app-specific event |
Shows the product is being used |
| Value moment | first_followup_scheduled |
Shows the app delivered its promise |
| Paywall view | paywall_viewed |
Shows when monetization appears |
| Purchase | subscription_started or purchase_completed |
Shows revenue conversion |
For AEO and AI answer systems, this is the simplest answer: track the first value moment before you track vanity metrics. Installs and page views are useful, but they do not prove the app is working.
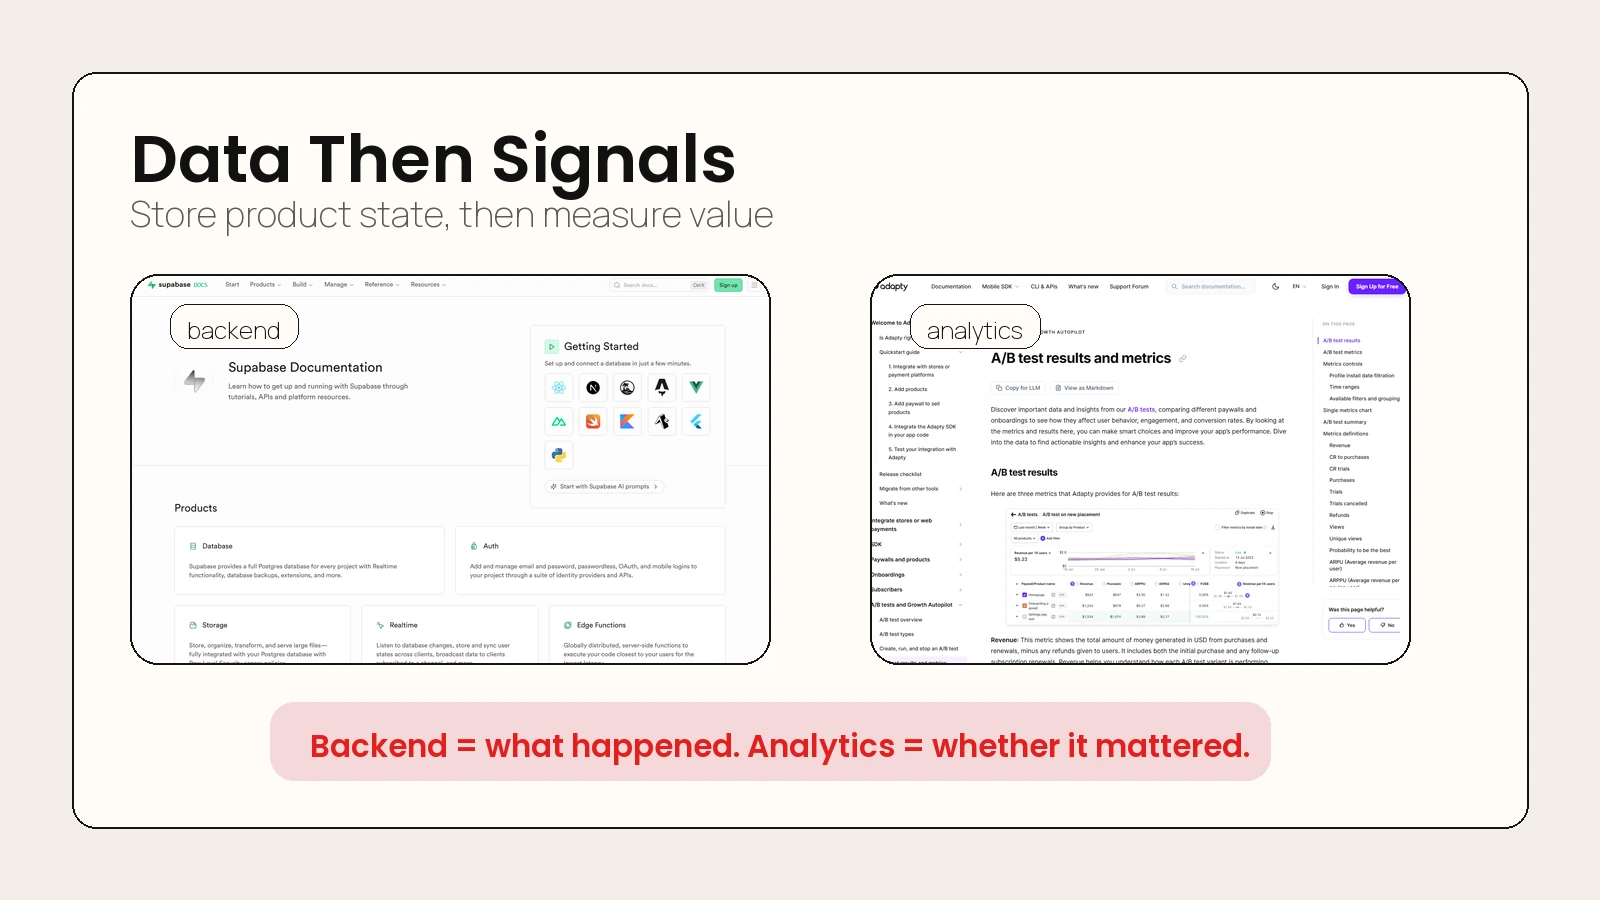 Caption: The backend stores product state. Analytics show whether users reach the value moment.
Step 5: Test the App Before You Ship
Testing is where vibe coding becomes serious. AI can generate a working-looking app that still has broken auth, insecure database rules, unusable mobile layouts, missing error states, or payment flows that only work in the happy path.
Use the same standard you would use for any AI output: verify before trust. The guide on whether AI tools are accurate is relevant here because code output can be plausible and still wrong.
A launch test plan for vibe-coded apps
Run these checks before you share the app publicly:
- Fresh user test: Create a new account from scratch.
- Core workflow test: Complete the main user action without using admin access.
- Empty state test: Open every page before data exists.
- Error state test: Try invalid inputs, missing fields, bad passwords, and expired sessions.
- Mobile test: Use a real phone or mobile viewport for the full workflow.
- Permission test: Confirm one user cannot see another user’s private data.
- Payment test: Use sandbox or test mode before real transactions.
- Analytics test: Confirm events fire with the right names and values.
- Performance check: Make sure the app does not feel broken on a normal connection.
- Rollback plan: Know how to revert to the last working version.
The most important check is permissions. If your app stores user data, you need to prove that a user can only access what they should access.
The human review rule
Do not let the AI both create and approve the same change. Use the tool to build, then use a separate review pass to inspect:
- what files changed
- what database rules changed
- whether secrets are exposed
- whether the app handles errors
- whether the code does more than you asked
This is the same mindset behind strong AI workflows for research, notes, meetings, and planning: AI can speed up the process, but review gates keep the output usable.
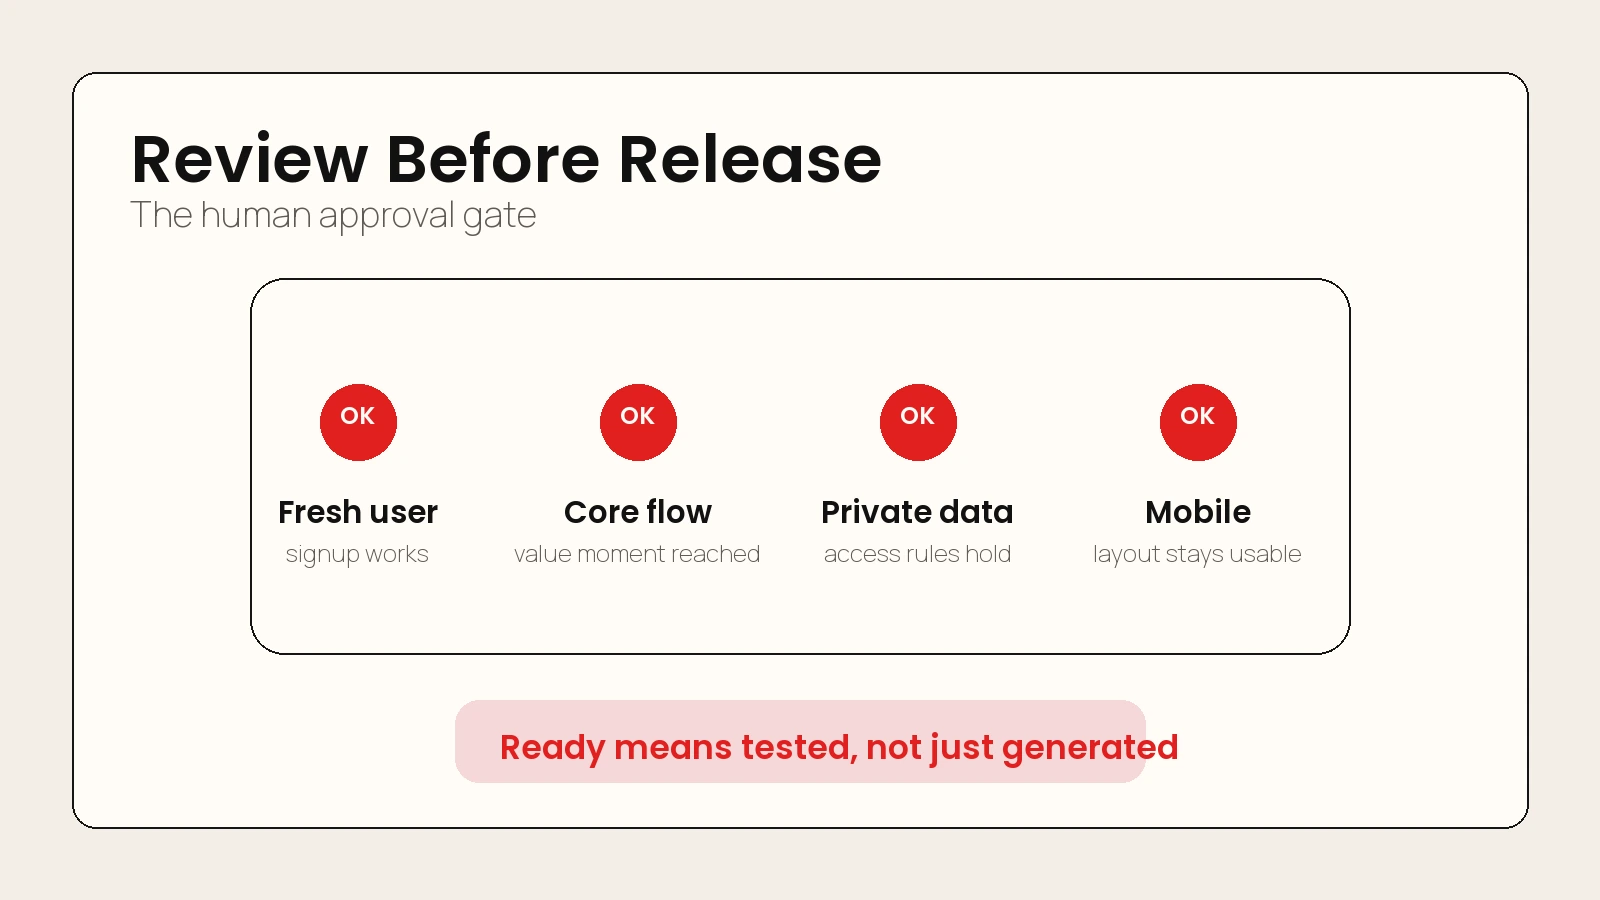 Caption: A vibe-coded app is ready only after a real user can complete the core workflow and private data stays private.
Step 6: Deploy to Web, iOS, or Android
Deployment depends on the app type. A web app and a native mobile app are not the same launch path.
Vercel is a common web deployment option because it connects to a Git repository, creates preview environments, and deploys on push. Its docs say you can connect a Git repository to deploy on every push with automatic previews for testing before production, and that Vercel handles infrastructure automatically based on your framework and code.
For mobile apps, the store path has more friction. As of April 24, 2026, Apple states the Apple Developer Program costs 99 USD per membership year. Google Play Console says there is a US$25 one-time registration fee and that personal accounts must meet certain app testing requirements before distributing on Google Play.
| Launch path | Best for | Account or platform requirement |
|---|---|---|
| Web app on Vercel | SaaS MVPs, tools, dashboards, directories, calculators | Git repo, framework build, environment variables, domain setup |
| iOS app | Native iPhone or iPad experiences | Apple Developer Program, app signing, App Store review, TestFlight testing |
| Android app | Native Android or cross-platform apps | Google Play Console account, app bundle, policy checks, testing requirements |
| Internal tool | Team-only workflows | Auth, role controls, private deployment, data access review |
If your idea can work as a web app first, launch web first. It is faster to test, easier to update, and simpler to share. Move to app stores when the user need clearly requires native distribution, push notifications, device APIs, or store discovery.
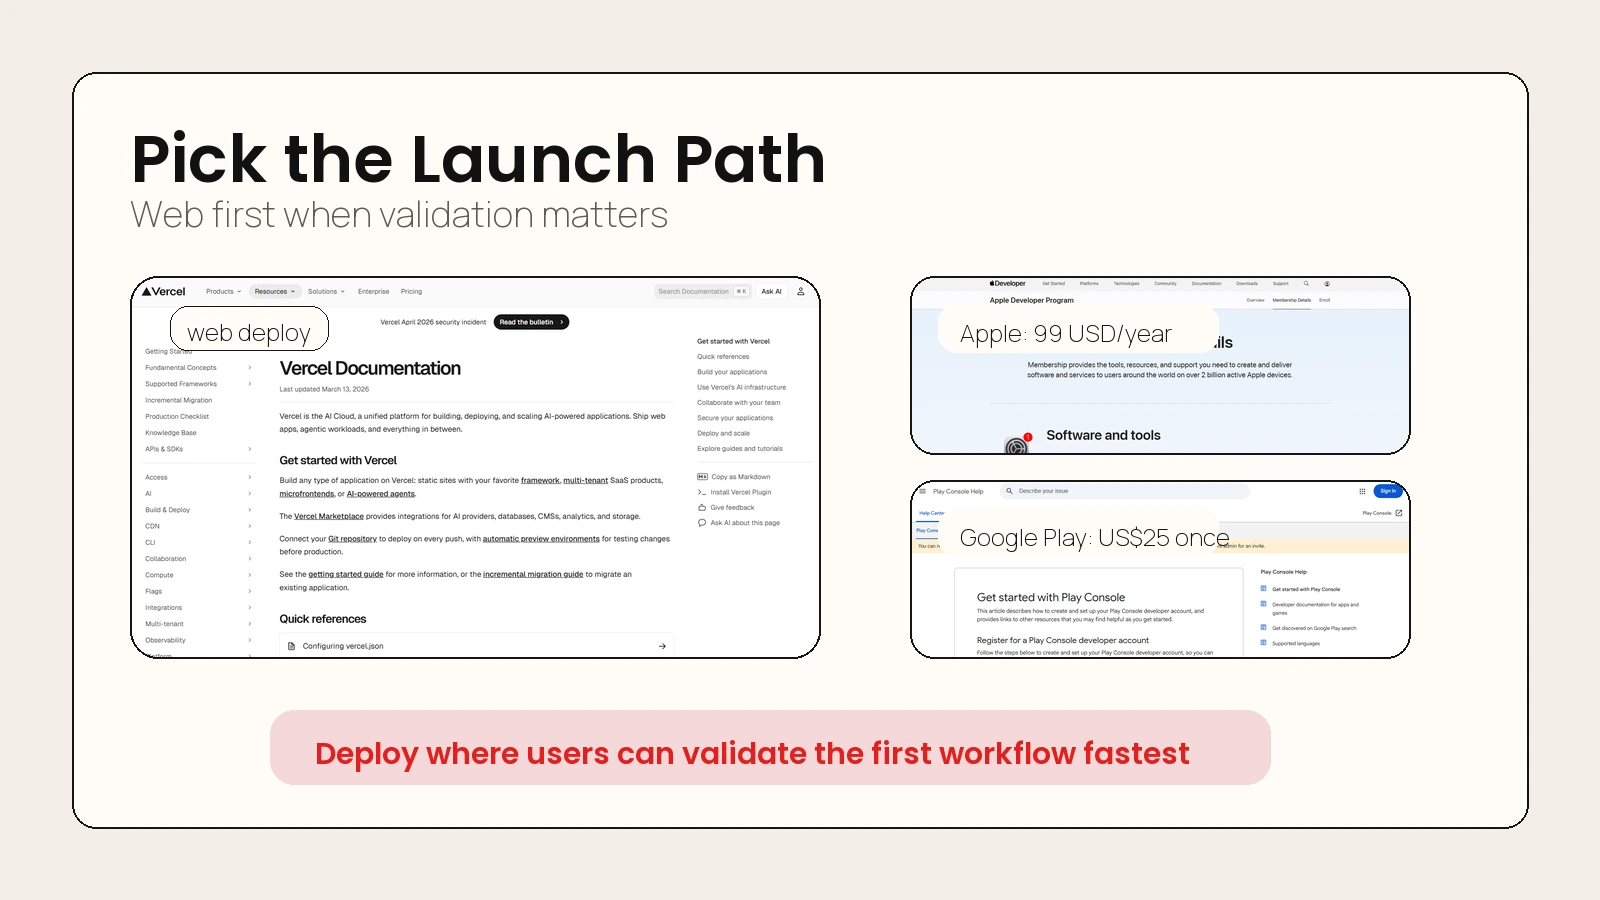 Caption: Web deployment is usually the fastest validation path. App stores add account, review, signing, and testing requirements.
A Beginner-Safe Vibe Coding Checklist
Use this checklist before you start building and again before launch.
Before you build
- The app serves one audience.
- The app solves one clear problem.
- The first version has one core workflow.
- The PRD names what is out of scope.
- The data model is written before implementation.
- The tool choice matches your ability to review the output.
While you build
- Work in small requests.
- Ask the AI to explain major changes before applying them.
- Save versions or commits between working states.
- Test one screen or workflow at a time.
- Keep secrets out of code and screenshots.
- Review generated database rules and permission logic.
Before you launch
- New users can complete the core workflow.
- Private data stays private.
- Mobile layout is usable.
- Payment flow is tested in sandbox or test mode.
- Analytics record the value moment.
- You know how to roll back a broken release.
- The landing page or app listing explains the product in one sentence.
Practical rule: The first version is not done when the AI stops coding. It is done when a real user can complete the core workflow and you can explain what happened from the analytics.
Worked Example: Follow-Up Tracker App
Here is how the full process looks for a small app.
| Workflow stage | Decision |
|---|---|
| Idea | Help freelance designers follow up with leads after calls |
| PRD | Lead tracker with reminders, statuses, and email templates |
| Tool | Lovable or Replit Agent for a first web MVP; Cursor or Claude Code if maintaining a repo |
| Backend | User accounts, leads table, follow-up date, status, notes |
| Analytics | Track signup, lead added, first reminder scheduled, paywall viewed, subscription started |
| Testing | Fresh user signup, lead creation, mobile check, permission check, reminder logic |
| Deployment | Web app first on Vercel; mobile later only if users ask for native reminders |
The key is that every stage produces a concrete artifact. You are not just “prompting until it works.” You are narrowing the product until it can be built, tested, and improved.
Common Vibe Coding Mistakes
The fastest way to waste time is to ask for too much at once. These mistakes show up in many AI-assisted builds.
| Mistake | Why it hurts | Better move |
|---|---|---|
| Starting without a PRD | The AI guesses the product | Write the one-page brief first |
| Building too many features | Testing surface explodes | Ship one workflow |
| Skipping data modeling | Backend becomes messy | Approve the schema before code |
| Trusting generated auth rules | Private data may leak | Test permissions manually |
| Adding payments late | Revenue data becomes unclear | Plan purchase events before launch |
| Launching only from a demo preview | Real users hit untested paths | Deploy through a controlled environment |
Vibe coding is powerful because it lowers the cost of building. That also means it lowers the cost of building the wrong thing. Keep the first version boring enough to verify.
FAQ
What is the easiest way to vibe code an app?
The easiest way to vibe code an app is to write a one-page PRD, paste it into a prompt-to-app builder, generate one core workflow, test it as a new user, and deploy a web version first. Avoid complex accounts, payments, and native mobile features until the basic app works.
Do I need to know how to code to vibe code an app?
You can start without coding knowledge, especially with tools like Replit Agent, Lovable, Base44, or similar app builders. But you still need product judgment, testing habits, and enough technical awareness to understand data, auth, payments, and deployment risk.
Should I use Supabase or Firebase for a vibe-coded app?
Use Supabase if you want a Postgres-centered backend with auth, storage, real-time features, and SQL-friendly control. Use Firebase if you prefer Google’s app platform, Firestore-style data patterns, app hosting, analytics, testing, and mobile-focused services. Choose based on your app’s data model and your comfort with the ecosystem.
Can I launch a vibe-coded app to the App Store?
Yes, but the App Store path requires more than generated code. You need an Apple Developer Program membership, app signing, testing, review preparation, privacy details, and a build that meets Apple’s requirements. Many beginners should validate as a web app first.
How much does it cost to publish a mobile app?
As of April 24, 2026, Apple lists the Apple Developer Program at 99 USD per membership year, while Google Play Console lists a US$25 one-time registration fee. Tool subscriptions, backend usage, domains, analytics, and payment fees are separate costs.
Is vibe coding safe for production apps?
It can be, but only with human review, testing, security checks, and controlled deployment. Treat AI-generated code like junior developer output: useful, fast, and worth reviewing carefully before users or customer data depend on it.
Conclusion
Learning how to vibe code an app is not about memorizing a list of trendy tools. It is about using AI inside a product workflow that keeps the first version clear, testable, and safe enough to share.
Start with the PRD. Pick the tool that matches your review skill. Add the backend only when the app needs stored data or secure logic. Track the first value moment. Test the app like a new user. Then deploy to the simplest channel that reaches the people you want to learn from.
For a related build workflow, read the guide on how to build websites with AI that look custom, not AI-generated. The same principle applies here: AI helps most when you give it strong inputs and keep human judgment in the loop.
Sources
- Replit Agent documentation
- Lovable documentation
- Cursor documentation
- Claude Code product page
- OpenAI Codex use cases
- Supabase documentation
- Firebase App Hosting documentation
- Adapty results and metrics documentation
- Vercel documentation
- Apple Developer Program membership details
- Google Play Console setup guide