

If you want better results from image models, the biggest upgrade is simple: stop writing image prompts like vague wishes and start writing them like creative briefs. The best image prompts tell the model what to make, how to frame it, what style to use, what text must appear, and what must stay fixed. Google’s official Imagen guide recommends descriptive language, useful context, and specific style direction, while OpenAI’s image docs now treat reference images and multi-turn editing as normal parts of the workflow (Google, OpenAI).
This article is for complete beginners who want a clear starting point, but it is also designed to take you much further. By the end, you should understand why short prompts sometimes work, why complex prompts often need structure, how to control text and layout, and how to use reference images when you need consistency or edits. If you want the broader text-prompt version of this skill, How to Use the Best AI Prompts for Everyday Work is the natural companion read.
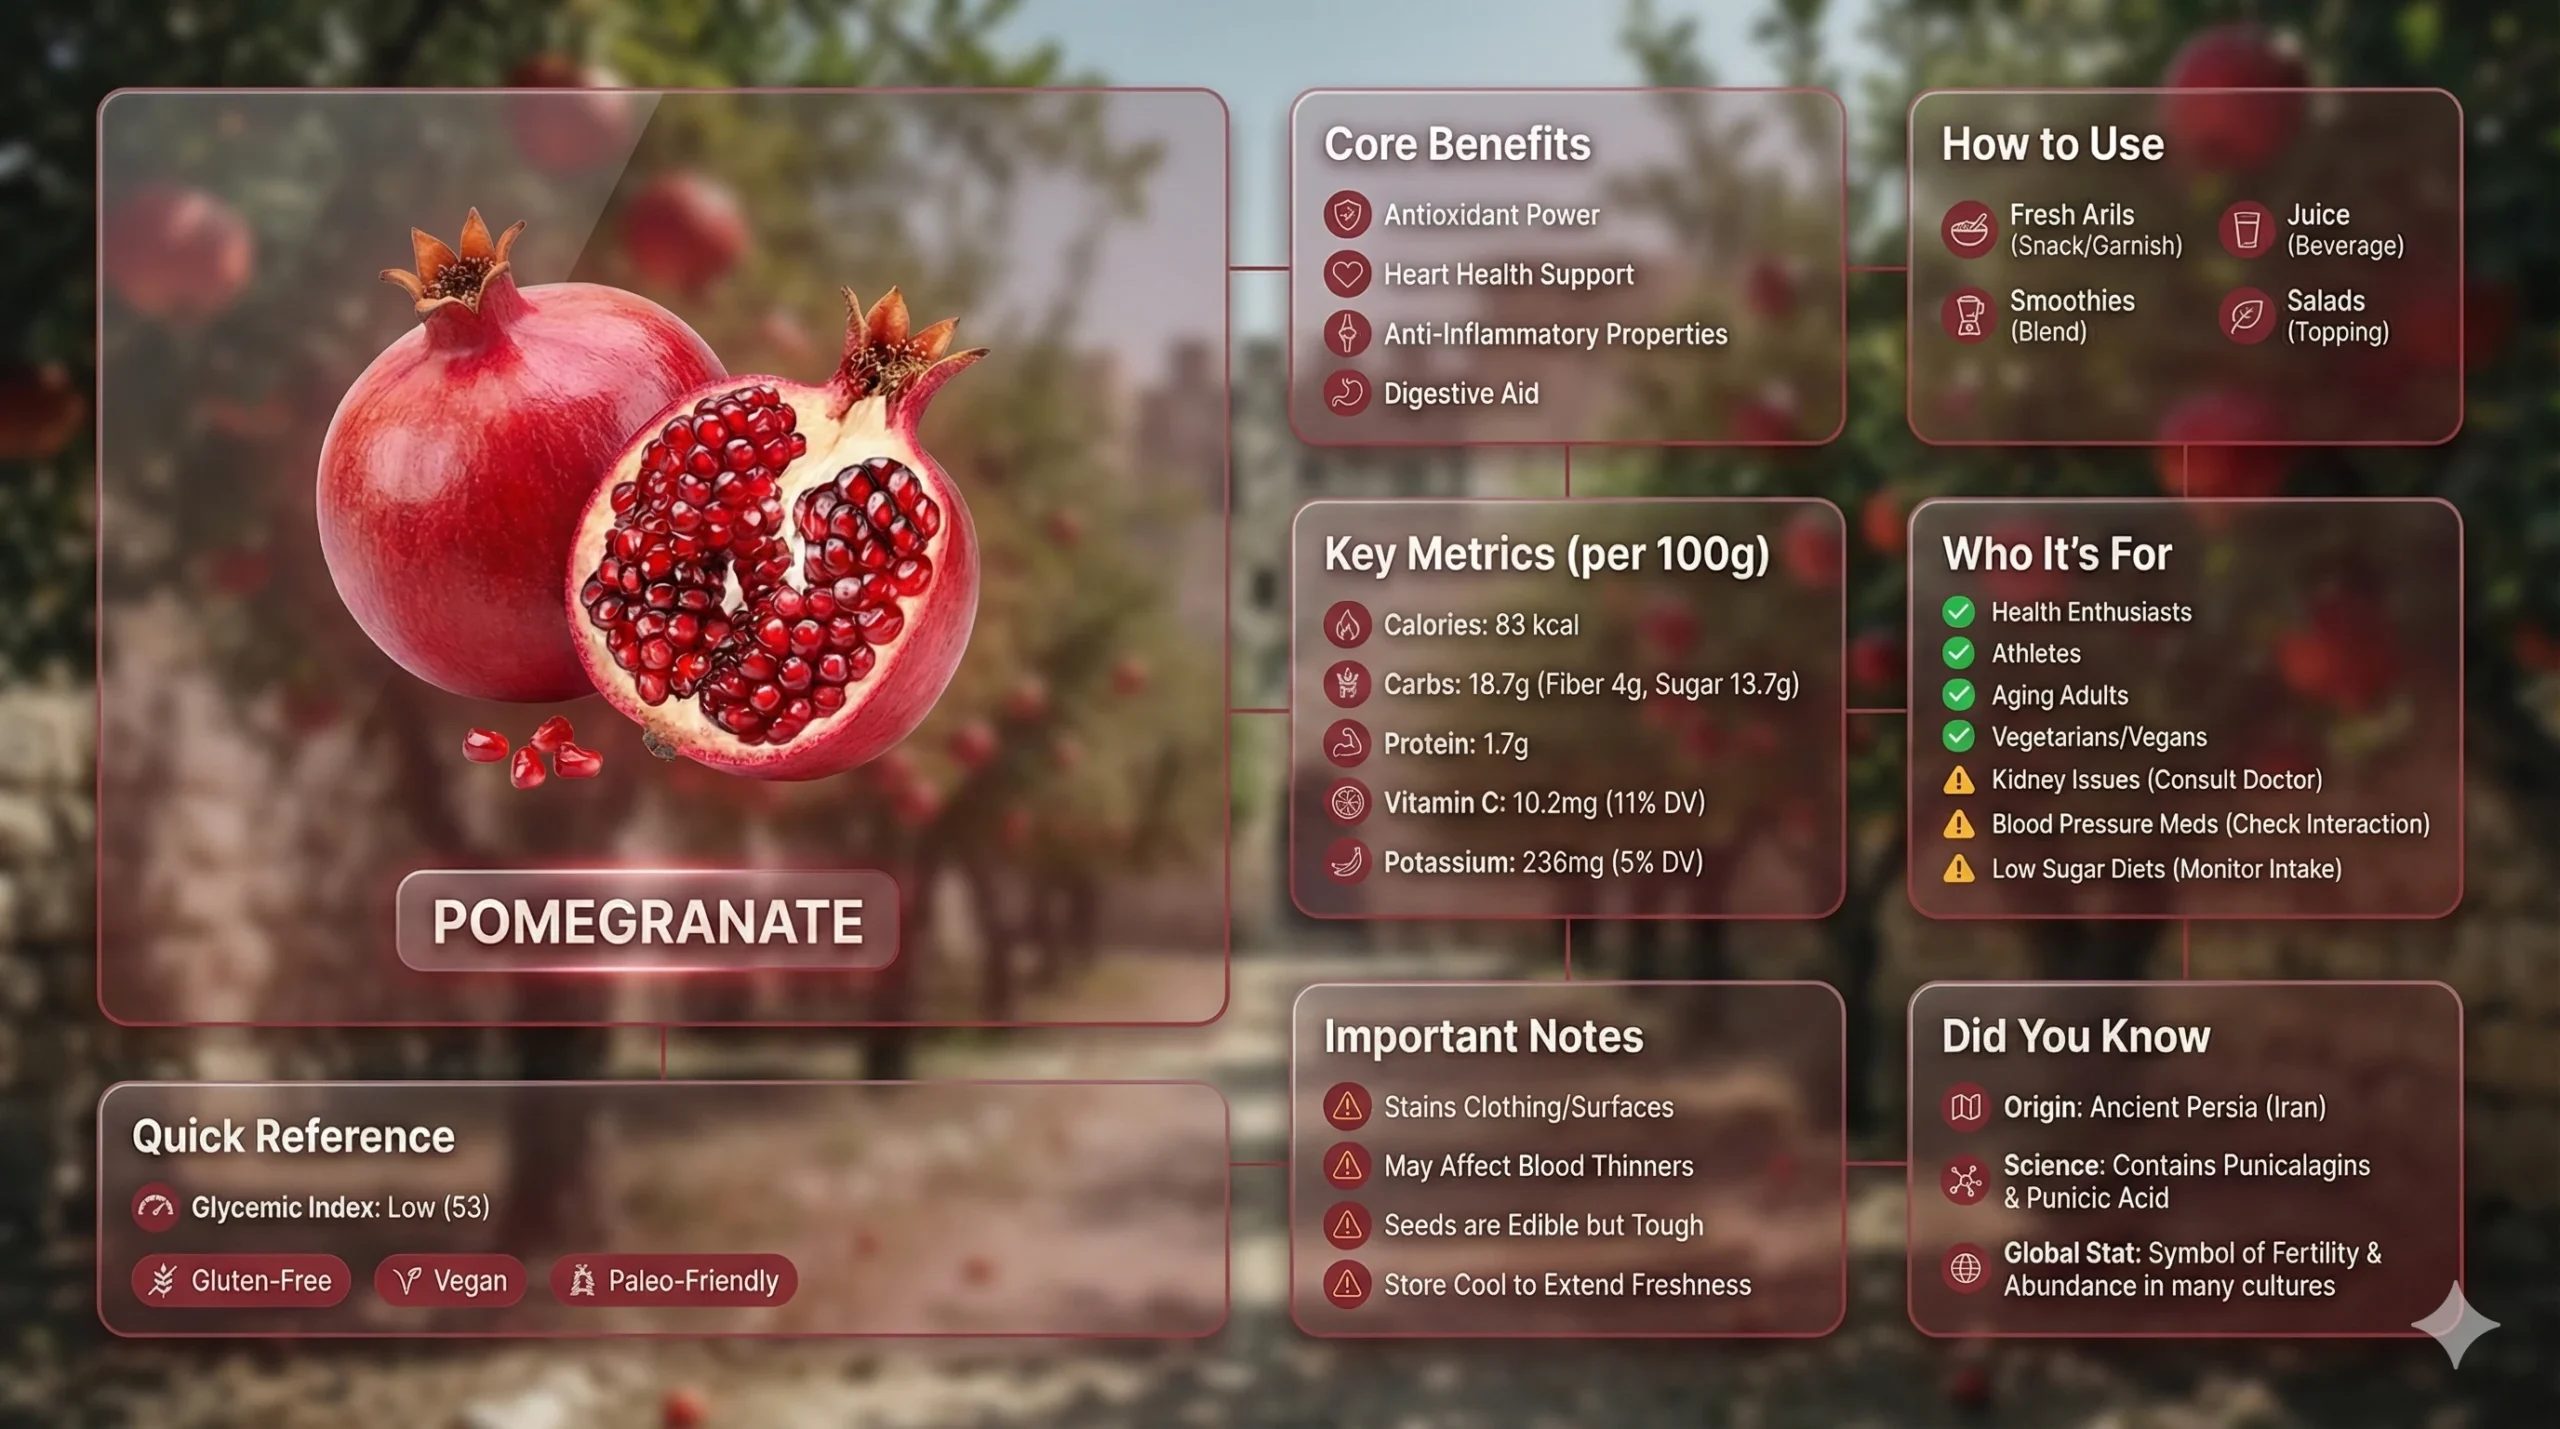 Caption: Advanced image prompts often work more like design briefs than one-line requests. This example succeeds because the prompt controls modules, content types, visual hierarchy, and text zones.
Key Takeaways
- Better image prompts remove guesswork. They tell the model what decisions it does not need to invent.
- Simple prompts can work when the job is narrow, but complex images need structure.
- The biggest skill jump comes from specifying output type, subject, composition, style, text, and constraints separately.
- Prompts with text, layouts, panels, labels, or infographics usually need exact wording, counts, and placement rules.
- Reference-image prompting works best when you separate what must stay the same from what should change.
- Mastery comes less from “magic words” and more from iteration, failure analysis, and reusable templates.
Table of Contents
- Why most image prompts fail
- The beginner formula for better image prompts
- The six control levers that upgrade your prompts
- How to prompt for posters, text, and infographics
- How to use reference images and editing prompts
- A skill ladder for going from beginner to advanced
- The iteration loop that makes you better fast
- Common image prompting mistakes
- Reusable image prompt templates
- FAQ
Why Most Image Prompts Fail
Most weak image prompts fail for the same reason weak text prompts fail: they leave too many decisions open. If you type “make a cool coffee poster,” the model has to guess the visual style, the angle, the lighting, the color palette, the typography, the amount of text, the layout, and even what “cool” means.
That is why beginners often feel image generation is random. The model is not being random so much as filling in blanks you never explicitly controlled.
| If you do not specify this | The model has to guess |
|---|---|
| Output type | Photo, poster, illustration, diagram, ad, thumbnail, infographic |
| Subject details | Who or what is in the image, and with which defining features |
| Composition | Close-up, wide shot, centered, angled, top-down, portrait, landscape |
| Style | Realistic photo, watercolor, anime, vector, 3D render, pencil sketch |
| Text | Whether text exists, what it says, where it goes, and how big it is |
| Constraints | Number of panels, exact labels, aspect ratio, what must stay unchanged |
The important exception is this: short prompts can still work when the task is narrow and the image has very few moving parts. If the goal is specific enough, you do not always need a giant prompt.
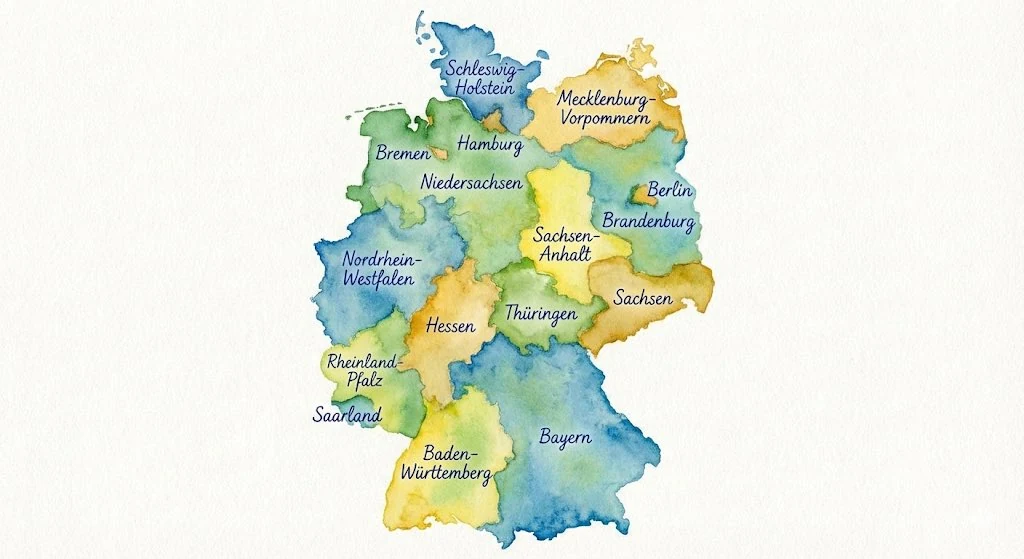 Caption: Short prompts work best when the task is tightly bounded. Here the job is clear: a watercolor map of Germany with every state labeled.
That is the first big lesson of image prompting: prompt length is not the goal. Decision control is the goal.
The best prompt is not the longest prompt. It is the shortest prompt that still controls the important decisions.
The Beginner Formula for Better Image Prompts
If you are starting from zero, use this five-part formula:
Image type + subject + style + composition + must-have details
This works because it covers the core decisions without overwhelming you.
The five parts
| Part | What it answers | Example |
|---|---|---|
| Image type | What kind of output do you want? | poster, portrait, product shot, infographic, map |
| Subject | What should appear? | a ceramic coffee mug, a woman in a yellow raincoat, a VR headset |
| Style | How should it look? | watercolor, cinematic photo, flat vector, hand-drawn sketch |
| Composition | How should it be framed? | centered, close-up, top-down, vertical 4:5, wide 16:9 |
| Must-have details | What cannot be left to chance? | headline text, red background, 3 labels, no extra objects |
Weak prompt vs better prompt
Weak prompt
Make a cool coffee poster.
Better prompt
Create a vertical coffee poster for a modern cafe.
Subject: one ceramic cappuccino cup on a wooden table.
Style: warm editorial product photography.
Composition: centered subject with negative space at the top.
Must-have details: soft morning window light, brown and cream palette, headline text "Morning Starts Here".
Aspect ratio: 4:5.
The better version does not sound magical. It just removes ambiguity.
If you are brand new to AI in general, How to Start Using AI as a Complete Beginner is useful background because the same principle applies there too: clear instructions usually beat clever-sounding prompts.
The Six Control Levers That Upgrade Your Prompts
Once the beginner formula feels natural, the next step is learning the six levers advanced prompt writers use repeatedly.
1. Output Type
Say what the image is supposed to be in the real world. Is it a thumbnail, a social post, a packaging label, a magazine cover, an explainer slide, or a product diagram? This is often the first thing strong prompts specify because it controls the model’s assumptions.
2. Subject Definition
Define the main subject with enough precision to avoid drift. That can mean age, clothing, object material, pose, facial expression, environment, or product category. For simple scenes, one sentence may be enough. For complex scenes, you may need a short block.
3. Composition and Camera
This is one of the biggest upgrades beginners miss. Good prompts often specify:
- close-up, medium shot, or wide shot
- front-facing, side angle, top-down, or low angle
- centered or off-center composition
- vertical, square, or landscape aspect ratio
- whether there should be negative space for text
4. Style and Medium
Do not just say “beautiful” or “aesthetic.” Say what the image should feel like in visual terms: watercolor, glossy 3D render, studio product photo, high-fashion portrait, chalkboard sketch, or vintage patent drawing.
5. Lighting, Color, and Materials
This is where prompts start looking more professional. Instead of saying “make it premium,” say:
- warm gold backlight
- soft studio lighting
- muted blue and cream palette
- reflective black acrylic surface
- rough parchment paper texture
6. Text, Layout, and Counts
This is the difference between average image prompting and strong commercial prompting. If the image includes words, labels, callouts, panels, steps, or modules, specify them directly.
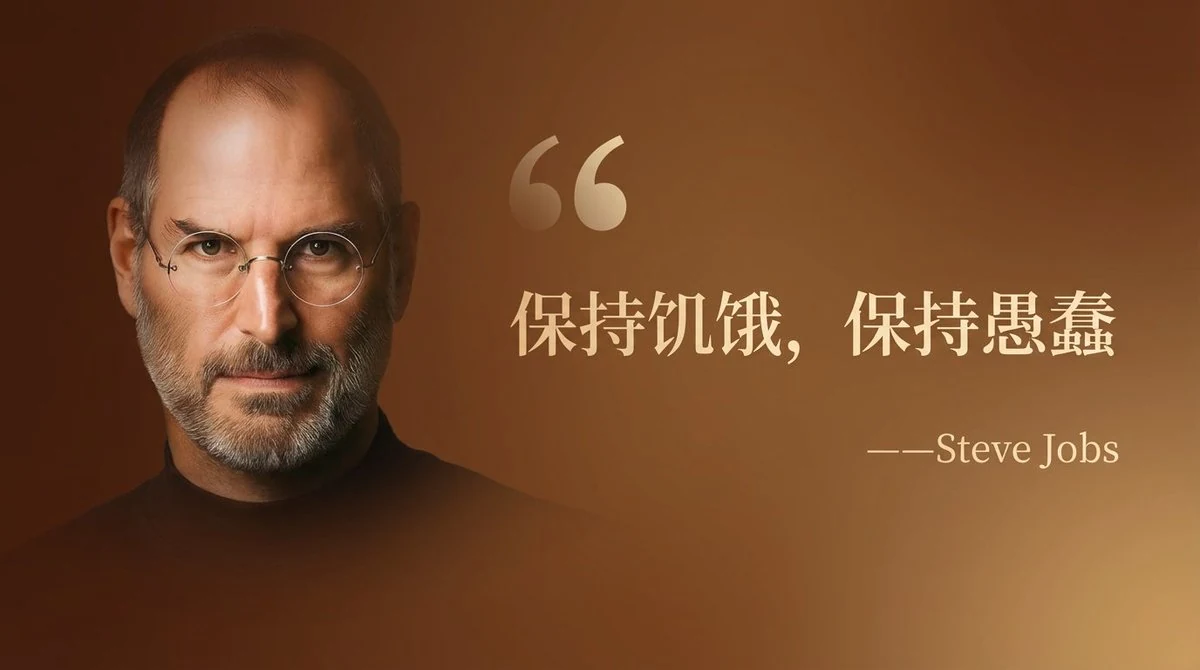 Caption: The prompt behind this image is not complicated because of fancy adjectives. It is strong because it defines the background, text style, text placement, and the portrait-to-text ratio.
For example, compare these two instructions:
| Weak wording | Better wording |
|---|---|
| “Add some text” | “Place the headline at top left in a large serif font” |
| “Make it look organized” | “Use a 2×2 grid with one headline area and three supporting panels” |
| “Include facts” | “Add 5 exact data points in the bottom-right module” |
| “Make it premium” | “Use a clean high-tech 3D render with soft studio lighting and glowing accents” |
That is why many advanced prompts read less like poetry and more like production notes.
How to Prompt for Posters, Text, and Infographics
This is where image prompting usually stops being casual and starts becoming a real design skill.
If you want posters, diagrams, explainers, or product infographics, you need to stop thinking in terms of “describe the vibe” and start thinking in terms of visual architecture:
- What is the image type?
- What is the main centerpiece?
- What text blocks must exist?
- How many labels, modules, or panels are required?
- Which details must be exact?
Google’s image prompting guidance explicitly recommends descriptive language, context, and specific style references (Google). In practice, high-performing prompts for designed images go even further: they specify zones, counts, layout relationships, and content rules.
A useful mindset shift
For simple art, one sentence can be enough.
For complex graphics, think like this:
- not “make an infographic about a VR headset”
- but “create an exploded-view product poster with 8 callouts, one headline block, one footer, and a vertically stacked component breakdown”
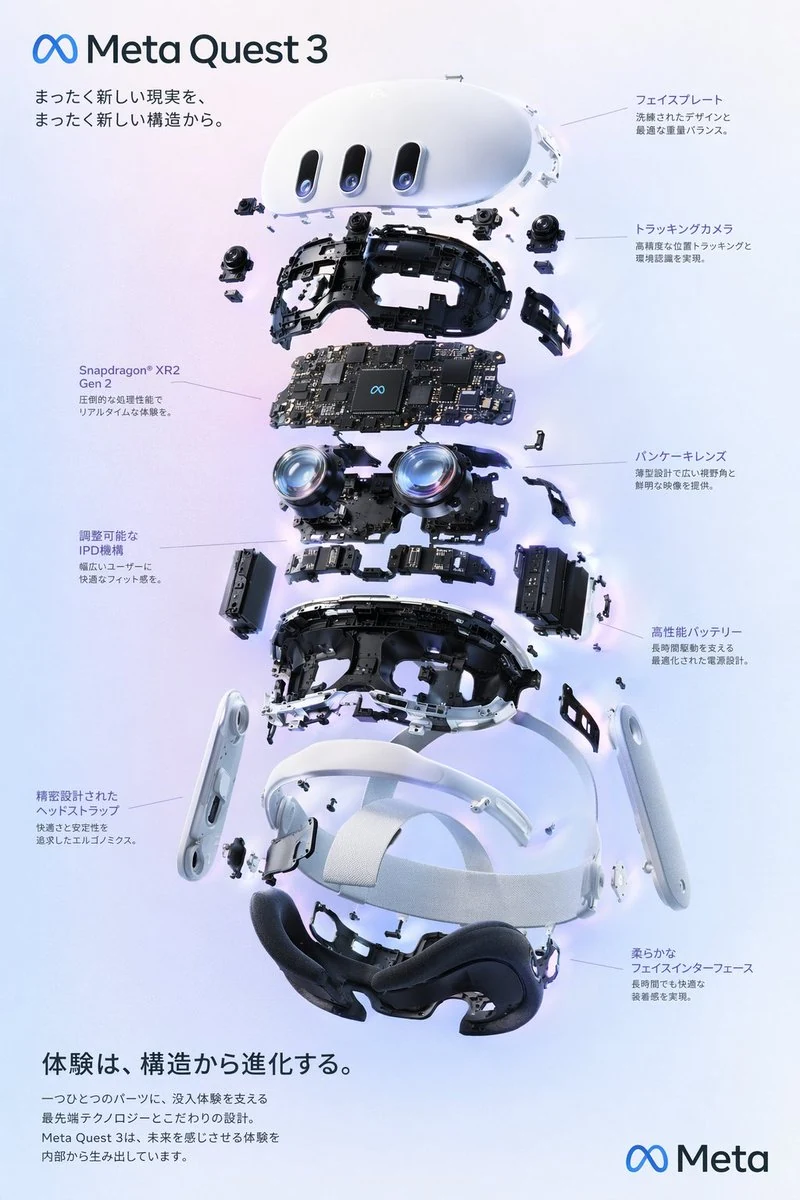 Caption: Advanced prompts work when they treat the image as a system. This example defines the subject, layout, callouts, footer, and text zones instead of relying on vague style words.
Why structure beats word soup
Many beginners try to improve prompts by stacking adjectives:
cinematic, beautiful, futuristic, luxury, ultra-detailed, stunning, aesthetic
That can influence mood, but it does not reliably control the image. Compare that with a structured prompt:
Type: exploded-view product poster
Subject: VR headset
Style: clean high-tech 3D render
Background: soft gradient
Layout: vertically stacked internal layers with 8 callout labels
Header: product name at top left
Footer: short product statement at bottom
The second version gives the model a job it can execute.
The practical rule
When the image has text, panels, or information density, specify:
- the exact image type
- the number of sections or labels
- the main focal object
- what the headline says
- where supporting text goes
- what must be kept readable
If you need more than a loose visual, write the prompt like a brief.
How to Use Reference Images and Editing Prompts
Reference-image prompting is one of the fastest ways to get better results because it teaches you to separate identity, structure, and style. OpenAI’s image generation guide explicitly supports generating with one or more reference images and iterating through multi-turn edits (OpenAI).
The biggest mistake people make here is saying only what should change. Strong editing prompts also say what must remain fixed.
The best editing pattern
Use four blocks:
PreserveChangeKeep fixedOutput
Example: turning a photo into an illustrated header
Use the uploaded photo as the identity reference.

Preserve:
- the same person
- the same facial features
- the same friendly expression

Change:
- convert the image into a simple hand-drawn header illustration
- use a blue-green gradient background

Keep fixed:
- half-body framing
- presentation gesture

Output:
- 16:9 article header
- large title text at left
- clean white background around the figure
 Caption: Reference prompts get stronger when they clearly separate the identity to preserve from the style and layout you want to change.
Example: transforming while keeping pose and framing
Using the reference image, keep the same pose, camera angle, framing, and turquoise chair background.
Transform the subject into a polished lifestyle portrait with soft natural lighting, a relaxed cream outfit, and realistic skin texture.
Do not change the overall seated posture or the background shape.
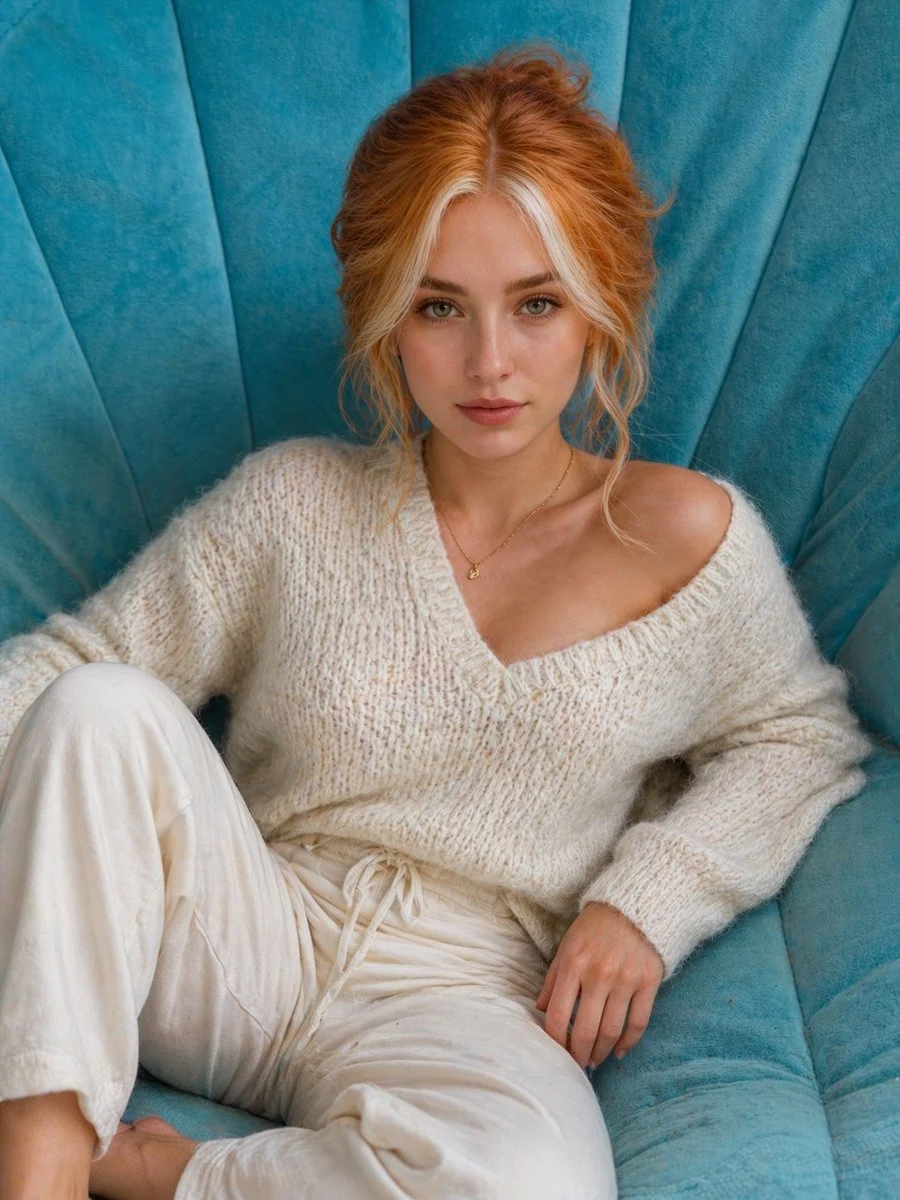 Caption: Editing prompts work best when they define the invariants. Here the prompt succeeds because it protects pose, framing, and background while changing the rendered subject.
That pattern is useful for:
- identity consistency
- style transfer
- product relighting
- packaging redesign
- turning sketches into polished renders
- turning flat diagrams into more detailed versions
If accuracy matters, do not trust the first output automatically. Are AI Tools Accurate? How to Set Realistic Expectations is the right companion article because stronger prompts improve control, but they do not make the model infallible.
A Skill Ladder for Going from Beginner to Advanced
If you want to go from zero knowledge to real skill, practice in stages.
Level 1. Narrow single-subject prompts
Start with images that have one obvious job:
- a watercolor map
- a studio portrait
- a product on a white background
- a simple poster with one object
Your goal here is to learn subject, style, and composition without dealing with complex layouts.
Level 2. Add framing and camera control
Now start controlling:
- close-up vs wide shot
- top-down vs eye level
- centered vs off-center
- portrait vs landscape aspect ratio
This is the stage where your prompts begin to feel intentional instead of lucky.
Level 3. Add text and layout
Once simple compositions feel stable, start prompting:
- exact headline text
- label counts
- panel counts
- negative space for typography
- poster, thumbnail, or card formats
This is where you begin moving from image generation to image design.
Level 4. Use reference images
Now practice preserving:
- identity
- pose
- framing
- product shape
- background structure
Then change only one or two things at a time, such as style, outfit, color palette, or medium.
Level 5. Write system-style prompts
At the advanced level, do not think in one sentence. Think in components:
- type
- subject
- scene
- layout
- copy blocks
- counts
- colors
- output rules
That is how you prompt complex explainers, packaging, ad mockups, storyboards, and infographics.
The Iteration Loop That Makes You Better Fast
Mastery does not come from writing one perfect prompt. It comes from diagnosing failure and revising the right part.
OpenAI’s docs support multi-turn image generation and editing precisely because iteration is normal, not exceptional (OpenAI).
Use this four-pass loop
- Write the core prompt. Define output type, subject, style, and composition.
- Review the first image for the main failure. Do not change everything at once. Identify the biggest miss.
- Revise the missing decision. Add layout, text, counts, lighting, or preservation language based on what failed.
- Save the working version. Once the image is close, save the prompt as a reusable template.
Failure-to-fix table
| If the result fails like this | Add or change this |
|---|---|
| Too generic | Make the output type and subject more specific |
| Wrong style | Name the medium, materials, and visual reference style |
| Bad composition | Add camera angle, crop, framing, and aspect ratio |
| Text is weak or misplaced | Specify exact words, location, hierarchy, and language |
| Layout is messy | Define panel count, module count, or relative positions |
| Character or object drift | Add a reference image and preservation rules |
| Too busy | Reduce the number of objects and simplify the scene |
If you want the workflow version of this habit, How to Use AI Workflows for Research, Notes, Meetings, and Planning shows the same upgrade in a broader way: good results come from repeatable loops, not one-off attempts.
Common Image Prompting Mistakes
Most prompt mistakes are not technical. They are structural.
1. Using vibes instead of instructions
“Cinematic,” “luxury,” and “aesthetic” can help, but they do not replace subject, composition, or layout.
2. Asking for complex graphics without specifying structure
If you need a poster, slide, diagram, or infographic, say so. Then define the zones, text, counts, and hierarchy.
3. Forgetting aspect ratio
A prompt for a thumbnail, story graphic, and desktop banner should not use the same framing assumptions.
4. Not protecting what must stay fixed
When editing or using a reference image, always state what must remain unchanged.
5. Changing too many variables at once
If you change subject, style, composition, and text in one jump, you will not know what improved or broke the result.
6. Treating prompt length as a badge of skill
Some great prompts are one sentence. Some need structured blocks. Skill is knowing which kind of prompt the job requires.
7. Overusing negative prompting before positive clarity
One useful pattern from strong image prompt collections is that many successful prompts spend more time describing the desired image than listing giant blocks of things to avoid. Start by making the target image clearer first.
Good image prompting is not about sounding artistic. It is about making the model’s job easier to execute correctly.
Reusable Image Prompt Templates
These are better used as working templates than as fixed formulas. Edit them to match the job.
1. Beginner image prompt template
Create a [image type] of [subject].
Style: [visual style or medium].
Composition: [camera angle, framing, aspect ratio].
Lighting and color: [lighting direction, palette, mood].
Must-have details: [important objects, text, or exclusions].
2. Poster or social graphic template
Create a [poster / social card / thumbnail].
Subject: [main object or person].
Style: [editorial photo / hand-drawn / bold vector / 3D render].
Layout: [where the subject goes, where text goes].
Text:
- Headline: "[exact text]"
- Subhead: "[exact text]"
Design rules:
- [number] panels or modules
- [color palette]
- [aspect ratio]
3. Infographic or explainer template
Type: [infographic / diagram / explainer poster]
Subject: [main object or theme]
Style: [clean 3D render / watercolor map / chalkboard sketch]
Layout:
- centerpiece: [main visual]
- modules: [number]
- labels: [number]
- footer: [what appears there]
Content rules:
- include [exact count] facts or callouts
- use [language]
- keep headline at [position]
4. Reference-image edit template
Use the uploaded image as the reference.

Preserve:
- [identity / pose / framing / object shape / background]

Change:
- [style / clothing / lighting / medium / text]

Keep fixed:
- [camera angle / composition / important colors / placement]

Output:
- [final image type]
- [aspect ratio]
- [exact headline or label text if needed]
5. Prompt revision template
Keep the current image, but revise these points only:
- [fix 1]
- [fix 2]
- [fix 3]
Do not change:
- [what should remain stable]
If you already use AI for writing, planning, or research, save your best image prompt templates the same way you would save good text prompts. That is the moment prompting turns into a repeatable skill instead of a random experiment.
FAQ
How long should an image prompt be?
As long as the job requires and no longer. A simple subject with one style can work with one sentence. A poster, diagram, or infographic may need structured blocks because there are more decisions to control.
Do I need fancy art vocabulary to write better image prompts?
No. Plain language works well if it is specific. You need clear nouns, layout instructions, style direction, and constraints more than dramatic wording.
How do I get better at image prompting quickly?
Practice in layers. Start with single-subject prompts, then add camera and aspect ratio, then text and layout, then reference-image edits, then system-style prompts for complex graphics.
How do I make AI-generated text inside images better?
Ask for exact wording, exact placement, and the correct output type. “Poster with headline at top left” is stronger than “add some text.” Designed images improve when text is treated as part of the layout, not an afterthought.
Should I use JSON-style prompts?
Use structured prompts when the image is structurally complex. If the job includes many modules, sections, labels, or UI-like regions, JSON-like blocks can help you think clearly. For a simple portrait, they are usually unnecessary.
When should I use a reference image instead of text only?
Use a reference when identity, pose, framing, product shape, or composition matters. Text-only prompts are best when you are creating from scratch. Reference prompts are best when consistency matters.
Conclusion
If you want to write better image prompts, stop chasing magic phrases and start controlling decisions. The strongest prompts define the image type, subject, composition, style, text, and constraints in a way the model can actually execute.
That is how beginners get better fast, and it is also how advanced users build complex visuals that look intentional instead of lucky.
Start with one simple image this week. Then rewrite the same prompt three times: once to improve composition, once to improve text or layout, and once to preserve something with a reference image. That small loop will teach you more than memorizing fifty prompt buzzwords.
Image Credits
featured.webp: “Premium liquid glass Bento grid product infographic with 8 modules” by Mansi Sanghani, from original source post, surfaced via the Awesome Nano Banana Pro Prompts collection. Used under CC BY 4.0.visual-simple-map.webp: “Watercolor map of Germany with labeled states” by Florian Gallwitz, from original source post, surfaced via the Awesome Nano Banana Pro Prompts collection. Used under CC BY 4.0.visual-layout-quote-card.webp: “Wide quote card with portrait and Chinese/English customization” by Nicolechan, from original source post, surfaced via the Awesome Nano Banana Pro Prompts collection. Used under CC BY 4.0.visual-reference-header.webp: “Hand-drawn style header image prompt from photo” by セミナー講師専門AIコンシェルジュ|工藤 晶, from original source post, surfaced via the Awesome Nano Banana Pro Prompts collection. Used under CC BY 4.0.visual-system-poster.webp: “VR Headset Exploded View Poster” by wory@ホッピング中, from original source post, surfaced via the Awesome GPT Image 2 Prompts collection. Used under CC BY 4.0.visual-edit-transform.webp: “Profile / Avatar – Cat to Human Portrait Transformation” by Bojan Tunguz, from original source post, surfaced via the Awesome GPT Image 2 Prompts collection. Used under CC BY 4.0.